In this article I’ll talk about how I automated updating my Pelican-generated blog using a combination of PyPI, Travis-CI, and GitHub pages. This is something that has been in the works since I first switched by blog to Pelican.
If you are wanting to follow along and do this yourself, I will assume that you have a Pelican blog that you can generate locally. (Even if you move to this method for your public version of your blog, it can be helpful to be able to generate your blog locally to preview theme changes and new articles.) Many of these principals will apply if you use a different static site generator, but I’ll focus on using Pelican.
Static vs Dynamic Websites
Static site generators (including Pelican) are fundamentally different from dynamic websites (such as those run on WordPress) in when the pages of your website are generated, or rendered. With a static site, all the pages are completed rendered beforehand, and the resulting HTML is uploaded to the webserver. Dynamic websites, on the other hand, generate the page (and that one only) as you request it. For static websites, the advantages include:
- web hosting is simple: you only need a web server.
- web hosting is secure: no databases or scripting providers to secure or scale.
- web hosting scales well: on a dynamic website, your capacity constraint is almost always either database access or your ability to run the script that is your website; neither of these are used by a static site at display time.
- generally, no database: with Pelican, all site content (like this post) is stored in text files, greatly simplifying backups and the ability to use version control (like Git).
On the flip side, the disadvantages (or trade-offs) of static sites are:
- no dynamic content from the server: some dynamic content can be provided client-side (i.e. in the web browser) through the use of JavaScript, but you’re not going to be able to do anything that requires real-time server data or updates. For certain sites, this will be a deal-breaker, but in my case, I designed my site around this.
- two computers: with static site generators, you generally end up having two computers — one used to edit the site and its content, and a second webserver. In general, this is a small concern because you can use your existing desktop to edit the site and the webserver is much simpler than it would be for a comparable dynamic site. Although not the primary focus of this post, by the end, we will be able to update our static site from the web, similar to a dynamic site.
- the server can’t update itself: most dynamic sites allow you to update them directly, with immediate effect. This is the disadvantage that this blog post is about remedying.
My solution to being able to update my Pelican site auto-magically is what this post details. We will use GitHub for storage, PyPI for Pelican extras, Travis-CI for processing (site-generation), and GitHub Pages for site hosting.
GitHub for Storage
My setup stores the site data and configuration as a repo on GitHub. This does require some understanding of Git, but GitHub makes it very approachable.
Configuration consists of the Pelican configuration (two Python files), my
requirements.txt file which will tell Travis-CI which packages to install,
and the Travis configuration file (.travis.yml) itself.
The theme of the site (which is sometimes stored next to the site content) is actually uploaded as a module to PyPI (see the next section).
The posts are stored as “flat” text files, mostly written in Markdown.
Comments are also stored in per-post folders, also written in Markdown.
One thing to be aware of is that your source material is publicly available on the free version of GitHub. I don’t consider this an issue as my blog is publicly available with the same content. However, this might be an issue if you store pre-publication drafts or un-watermarked images as part of your blog. Also consider whether you want email addresses on comments to be publicly available. You can create private (i.e. not publicly viewable) repos if you are on one of GitHub’s paid plans, but then you’ll also have to pay to use Travis-CI.
Pelican Extras on PyPI
Because we are automating the generation of our site, we want to make sure we have replicate-able builds. One way I did this was I pushed a copy of all the plugins I used, plus my theme, to the Python package index, PyPI.
Pelican, historically, has used communal repos (on GitHub) to host
plugins and
themes. To use these themes and
plugins, you would clone these two repos to your local machine, and then point
your Pelican configuration to these local folders. However, maintaining these
local paths becomes extra complicated on Travis-CI, where the filesystem is
mostly out-of-sight and if you get the link wrong, your build will just crash.
Furthermore, versioning is complicated because you have to specify a Git commit
hash (which looks like this —> 0d4b2c26f8703fe9665fd4e94bba31be02e51fc8),
and if you upgrade one plugin (by selecting a later commit), you end up
upgrading all plugins. Python modules, uploaded to PyPI, is an established
solution that works well for both these issues.
But many pelican plugins aren’t available on PyPI (although a surprising number are). So my first order of business was to check PyPI, and upload any missing ones:
- four plugins (image_process, summary, post_stats, and optimize_images) were existing plugins that I packaged on put on PyPI myself,
- one plugin (CName) is based on code I found languishing in a pull request to the original Pelican Plugin repo,
- two plugins (nojekyll and jinja_filters) I wrote myself, and then posted to PyPI,
- one plugin (pelican_comment_system) I worked with the author to post on PyPI himself, and
- two plugins (pelican-alias and pelican-neighbors) were already on PyPI.
Packaging other’s code and posting it to PyPI felt kind of wierd. I wasn’t so
much worried about licensing, but sometime people (me, at least) are more
attached to their project than the text of the license might suggest. To this
end, I decided to name all the plugins I posted to PyPI in my own ‘namespace’ (i.e. minchin.pelican.plugin.[something]); if the original author does post
the plugin to PyPI themselves, I can always point mine to their “official” version.
Packaging the theme was less of an emotional issue — although it is based on DandyDev’s Bootstrap3 theme, I have modified it considerably, beyond what I though would be accepted back upstream. In other words, I feel like the theme design is “mine”.
In specifying a Pelican theme, the Pelican configuration file expects a folder location. Installing the theme as a Python module means that I can’t know the file location ahead of time, but I can ask Python at run time! So my theme has a short function:
# seafoam/__init__.py
from pathlib import Path

def get_path():
    """
    Shortcut for users whose theme is not next to their pelicanconf.py.

    Returns:
        str: file path to folder containing theme
    """
    # Theme directory is defined as our parent directory
    return str(Path(__file__).resolve().parent)
that is called in the pelican configuration file:
# pelicanconf.py

import seafoam
THEME = seafoam.get_path()
BOOTSTRAP_THEME = 'seafoam'

# ... other settings
(Please feel free to copy this coding pattern! I borrowed it from a Sphinx theme.)
Things posted by me to PyPI, as a community resource, I feel should have some utility beyond my own. The theme is perfectly usable, as is, for other site, but doesn’t give you any simple options for changing the colour scheme, but I’m working to change that too.
Travis-CI for Processing
Travis-CI really is a wonder. At it’s core, what it sets out to do is make it
simple to run automated tests for open source software. (The “CI” stands for
“Continuous Integration”, which is just the fancy way of saying “run the tests
all the time!”) At its core though, Travis provides a Linux virtual machine,
and therefore, we can have Travis build and publish our blog, if we can figure
out the automation steps. In Travis-land, we configure building our blog as the
“test” and uploading as the “deployment”. Travis even has a built-in
(though experimental) deployment procedure to push a static site to
GitHub Pages!
Several other articles exist online explaining how to publish your Pelican blog like this via Travis, but the vast majority rely on a bash script rather than Travis’ build-in deployment method. I didn’t want to deal with bash; working on a Windows machine at home makes debugging bash scripts a slow and painful process done on Travis directly. I do use Invoke (a Python library) to store the command I use to build the blog (mostly so I don’t have to remember it and type it out each time), which specifies the Pelican preference file to use, and stops the build if a Pelican warning is encountered. The actual commend is:
pelican -s publishconf.py --fatal=warnings
So my final Travis script (below) does four things:
- set up Travis for a Python project,
- installs my (frozen) Python requirements for building the blog,
- builds my Pelican blog, and
- pushes (“deploys”) my published blog to GitHub Pages.
# .travis.yml

# build using Python 3.6
language: python
python:
  - 3.6
# Cache Dependencies
cache: pip
# we need two Linux packages for the optimize_images plugin
addons:
  apt:
    packages:
    - optipng
    - libjpeg-progs

# install dependencies
install:
  - pip install --upgrade pip
  - pip install -r requirements.txt
# build our blog
script:
  - invoke publish_carefully

# deploy to GitHub pages
deploy:
  provider: pages
  local_dir: ../blog.minchin.ca-master/
  target-branch: master
  skip_cleanup: true
  github_token: $GITHUB_TOKEN  # Set in travis-ci.org dashboard
  # only deploy on "main" branch
  on:
    branch: pelican
As long as your code is publicly available on GitHub, Travis-CI is free to use.
GitHub Pages for Site Hosting
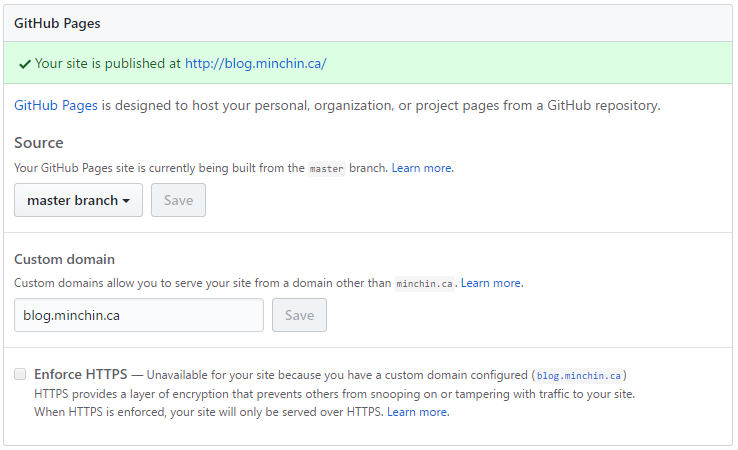
The actual hosting is done by GitHub Pages. There are a few settings we need set up to get this to work the way we want:
- Travis-CI requires a GitHub Token to be able to push the generated blog to GitHub. GitHub help explains how to create it, and Travis’ help explains what to do with it.
- I am publishing from the master branch of my repo. Be aware that Travis is going to destroy the history of this branch each time it publishes your site, so don’t store anything else in this Git branch.
- I am publishing to a custom domain
(blog.minchin.ca), so I set this up here, and use
my CName plugin automatically to create the appropriate
CNAMEfile in my generated site.
Closing Thoughts
Yes, this is more work to set up, that just publishing your blog from your desktop computer. But the advantage is now, anytime you push a change to GitHub, your blog will automatically be updated. This change can come from your home computer, or you can do it directly from the GitHub website. This means that you can update your website from anywhere you have an internet connection! You now have a static site that you can update from the internet. Congratulations!
Comments
There are no comments yet. Will you add the first one?